Image Slider

Showing posts with label Soy-free. Show all posts

Honey & Basil Strawberries with Lemony Vegan Ricotta & Simple Vegan Mock Ricotta Recipe


Bonjour my loverlies!

So, I was playing around with my vegan mock ricotta cheese recipe I made the other day and felt she needed perking up. 
I also decided to make a bit of extra effort in the food photography department to go along with the snazziness of this dessert.

It is not a mistake that Basil & strawberry are hanging out together. 
Yes, Basil is an herb that goes very well in savoury and in sweet applications. 
I know it sounds mad but trust me it's sooooooo good! 
You might be surprised to see how many culinary shows are doing this mix together. One of my favs is to pair them with avocado as a really palatte pleasing salad. 
That however, is another recipe for another day.

One of the coolest ways I have had this combo is a strawberry basil
macaron from this wonderful place I adore. 
It's called Pâtisserie de Nancy on Monkland Avenue in NDG here in Montréal. 
I could not stand macarons until I tried one of theirs.
Oh! So divine!
 I adore the cherry one's best but the mojito, vanilla, along with the strawberry basil & the passion fruit are just as delightful!
If you're ever in town you must stop there, I had a lovely convo with Nancy about her marvellous macarons-say that 3 times fast! 
I explained how surprised I was because every time I had had macarons before they had been so cloyingly sweet that my teeth hurt and I ended up throwing them away. She explained that her husband is the pastry Chef & he hails from France, he makes them the way he learned & perfected the recipe there and now I get to indulge in them here! This is the shop and some pics of her confections that I came across.
                                   
                                   
I am so eager to go there and get some scrumptious treats!
So, I suppose people would like the recipe. 
You will need the Vegan Mock Ricotta recipe on the bottom, after the Honey & Basil recipe post to make this simple & smashing dessert. Scroll down & you will see her.

HONEY & BASIL STRAWBERRIES WITH LEMONY VEGAN RICOTTA:

Ingredients :
1 Cup Vegan Ricotta, chilled
Zest of 1 Lemon
2 Tbsp Organic honey(you may use Maple or Agave syrup to keep it vegan)
1 tsp Vanilla
4 Basil leaves sliced fine into a chiffonade
1 Cup Strawberries chopped small dice

Method:
-Chop strawberries, add Basil, vanilla, & honey. Stir gently & allow to macerate on the counter while prepping the vegan ricotta.
-Zest 1/2 the lemon into the ricotta, stir throughout.
-Serve by portioning out 1/4 cup of vegan ricotta into 4 pretty serving bowls.
-Evenly portion out the strawberry mixture.
-Zest a bit of lemon on top of the portions just before serving.
-Serve immediately.


When I went raw vegan a ways back, I had tried a recipe from another blog and was happy with the texture but found the flavour was lacking. I am no longer able to be vegan thanks to my health issues but I still like to incorporate healthy foods and I find my numerous allergies, which include dairy, have left a sad cheesy void in my life. 
So, we improvise. No, it's not real ricotta cheese but it's a good compromise & works beautifully in uncooked applications.
It's not a cheap item to make, as Macadamia nuts & pine nuts are at the base of this recipe, however, I made an effort to keep it from being too cost prohibitive by using small amounts with great success. 
Real ricotta cheese was always a splurge item for special occasion recipes anyways, in my home at least. 
It's so easy peasy & looks lovely when served, you will impress any vegetarians & non-vegetarians in your life.

MOCK VEGAN RICOTTA CHEESE:

Cost range: Medium - High
Prep time: 15 mins. (Does not include soaking nuts & chill time)
Difficulty: Super easy
Serves: 2-4 people
Freeze: Not recommended, keeps 3 days in fridge.

Ingredients:

3/4 Cup Raw macadamia nuts
2 Tbsp Raw pine nuts
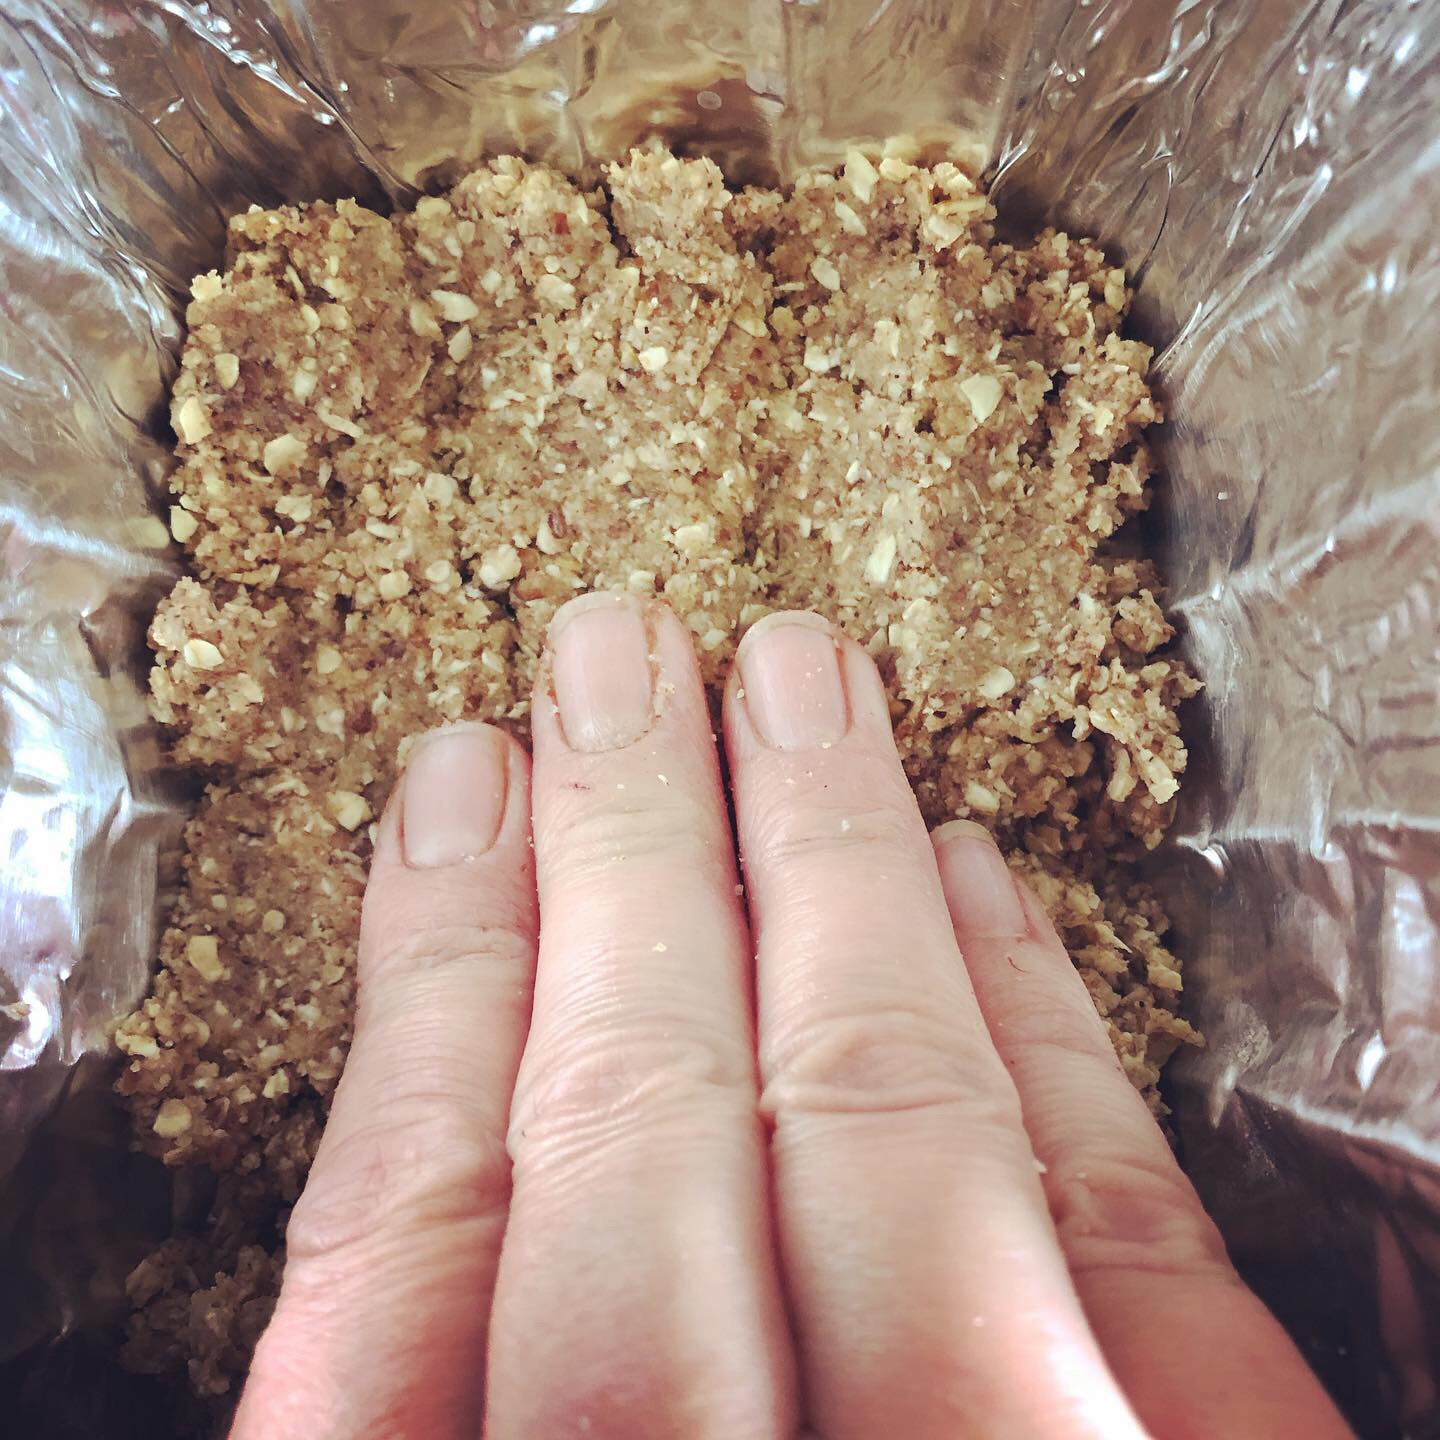
*In separate bowls for each nut, soak by covering with filtered water for 2-3 hours & then rinse thoroughly before using.

2 Tbsp Lemon juice
2 Tbsp Extra virgin olive oil
1/2 tsp Pink sea salt
1/2 Tbsp nutritional yeast
1/2 Cup Filtered water

*The reason the nuts must be soaked & rinsed is to soften them & remove any enzyme inhibitors that are naturally occurring on the nuts.

Method:

In a blender, add all ingredients and blend until slightly grainy in consistency. Add a Tbsp of water or more as needed but not too much.
Place in bowl, cover & chill for minimum 4-6 hours. Overnight is fine.

This recipe can be used in the sweet application as in the recipe above or you can use it in a savoury application, as the picture below demonstrates.

                          
This last image is sliced Roma tomatoes with fresh basil leaves, mock ricotta nestled between, drizzled with olive oil, sprinkled with Crumesan, salt and pepper to taste. So pretty & yummy!

Remember to share with someone you love & leave your comments or questions below, I love to hear from you.

Take care, be well, love freely...

Chef Kiki

Gluten-free & Vegan Maple Date Squares

Salut world!

It's Friday & your Gurl is back with this delightful and super easy, vegan, and gluten-free, Maple Date Square recipe.
I secretely wanted to make giant cake after seeing the below meme but decided that a small batch of date squares would suffice.
                        Image result for baking memes
I go through phases with date squares; like, gimme gimme and then, no touchie for a long while.
I first fell for date squares when this place called Commensal used to make them. They were an amazing vegetarian resto back in the day which sadly went the way of the dino. I liked their squares cuz they were oatty, not-too-sweet, and rich, buttery, goodness.
Sadly, they had gluten and I stopped indulging long before Commensal restos closed.
At the time gluten-free was basically new and unheard of, many people thought I was being over the top with my allergies and my health.
Ha! If they could see things now.
                                    Image result for baking gluten free memes

                                            Image result for baking gluten free memes

I woke up a few weeks ago and said, "Today is a date square day!"
And so, this recipe was born.
I think you will truly like the ease of it and I kept it small so you could have a little treat for that vegan/gluten-free guest, you will be seeing more of.
Seriously though, you can make them just for you and freeze what remains. Mine lasted a good month in our chest freezer, and sharing yummy noms is always appreciated.
Have fun making them and by all means, get the little one's involved!

Maple Date Squares for 1-2 people:
Base:
1/2 cup quick oats ground to slightly coarse flour
1/4 Cup ground almond flour
2 Tbsp of 1 flax egg (1tbsp flax with 3 Tbsp water)
1 Tbsp coconut sugar
2 Tbsp ground pecans
1/4 cup ground tiger nuts
1 /4 tsp bs
Pinch pink salt
1 Tbsp earth balance soy free
1 Tbsp organic coconut oil 
Pinch cinnamon 

For topping:
Reserve 3 Tbsp flour mix from base dry mixture before adding fats and flax egg
1/4 cup oats
1/4 cup ground walnuts
1 Tbsp coconut sugar
1 Tbsp ground pecan
1 Tbsp ground tiger nuts
1 Tbsp coconut flour
1 1/2 Tbsp earth balance 
I like a lot of crumble topping, you can sprinkle less of the completed mixture if you prefer a thinner crumble. Keep the leftover for putting on yogurt of choice. 

For filling:
6 medjool dates soaked pits removed
3 Tbsp maple syrup
1 tsp Vanilla
1 Tbsp flax egg that remains 
Pinch sea salt
1/3 cup oat milk unsweetened 
Blend all in mixer until almost smooth, I keep a few small chunks but not big one’s.

Method:
Preheat oven to 325 degrees

-Combine base mix ingredients remembering to reserve 3 Tbsp for crumble topping, press into loaf pan.

-Prep topping mix and reserve.

-Prep filling mix by blending filling ingredients in a processor.

-Smooth our date layer over base

-Crumble mixture on top (Do Not Press Down!) 

-Bake in a loaf pan for 12 minutes then turn 1/2 way and bake for another 6-10 minutes until a golden brown.

-Allow to cool completely before cutting into squares. 
(I like to chill mine as I prefer them cold but do what works for you.)

-Store in an airtight container overnight on counter or up to a week in the fridge. 


               My last bite that I scarfed down with a lovely glass of cold, unsweetened almond milk!


Let me know how this recipe turned out for you or if you have any questions, leave them in the comments down below.

Take care, be well, love freely...

Chef Kiki


The Kikicolada Smoothie Vegan & Gluten-free

Bonjour one and all!

It is Tasty Tuesday and that means recipe time!
Hot and hazy summer days are still here and I am on a 30-day liquid fast, that consists of special drinks, herbal tea’s steeped with fruits, freshly juiced juices, smoothies, and spring water.
Sadly, while trying to help a friend, I was re-exposed to toxic black mold by accident, for about 2 solid hours, back in June; and I have been paying for it ever since.
It means mold detox protocols, coping with health set backs, and a bit of a tough break but praying through it.
Won’t get into all that today, as I am here to post a scrumptious recipe which I am super psyched to share with you!
Turns out, I have a thing for pina coladas but as per usual, not a fan of alcohol, so I look for  healthier versions.
Unfortunately, so many I come across use coconut cream or coconut milk and I find it too rich and thick. There’s also major white sugar in most recipes that I cannot deal with, as it sets my autoimmune system into overdrive. I end up taking a sip or two and cannot finish it.
Such a sad, lonely, pina colada waste. Waaah waaah...
Good news though! Frustration and cravings seem to make for great creative companions, and in the end I chose to play in the kitchen and make my own version.
Yes, you can like pina coladas and getting caught in the rain Kiki!
                  I know, I found a pink coconut!

                    I do so love the rain, le sigh...
This recipe made me very happy indeed.
I got a great mild coconutty flavour that perfectly balanced with the pineapple. I used a small piece of avocado to give that richness one is used to in a colada, plus it gave some additional healthy fats.
I was thrilled to have come across some young coconuts whilst I was getting my food prep done, in order for this liquid fast fun!
Yes, it may seem odd but I do enjoy, and even look forward to the periods of fasting in my life. This time around I was really feeling the need to step back from eating and just get back to basics.
Here is the recipe, it made exactly one large mason jar with  a tablespoon or two leftover for taste testers in the local vicinity. There were none at my place so I got to enjoy it all! Mwuah hahahaha!


The Kikicolada

Ingredients:
1/4 Cup fresh young coconut meat
1 Cup fresh ripe pineapple
1/3 Cup fresh coconut water
1/3 Cup fresh pineapple juice
1/4 Cup spring water
1/4 Avocado ripe
1 small, ripe baby banana
1 Tbsp ground flax

Method:
-Blend all, serve over ice and enjoy immediately.

Side note: I used the juice from the pineapple that I bought that had already been cut, (I burned myself pretty badly recently and pre-cut is helping) there is always a good amount of that juice in the container and it tastes so good, do not waste it!

I hope you and yours really enjoy this recipe, it is a wonderful edition to those summer smoothies that brighten up any day.


Leave me your comments or questions down below, and if you try it, let me know how this recipe turned out for you.

Take care, be well, love freely...

Chef Kiki


Dairy-free Chai Tea Recipe & Paleo Waffle Adventures


Helloodles lovelies!

It is tasty Tuesday and I am excited about this blog post because this recipe is a new family favorite. A complete cup of comfort, super easy, only 4 ingredients-yup 4, and it is followed by waffles! If you only came for the chai tea recipe, head down below.
What could be better than freshly brewed chai tea and homemade waffles that are gluten-free and delectable?
So, I have a sad but true confession to make; I have not had a real, homemade, from scratch, waffle in at least 10 years!
I know...
Truth is I am more of a crepe woman, probably the French in me.
I also adore a good blueberry pancake, like, oh yeah!
Blueberry yum-yum, gimme some. Sorry Ludacris, I actually mean pancakes.
So, my mom got a special waffle iron that she has been wanting forever.

What I really liked about this is that it is double sided, so you can make 2 waffles at once, and you can remove the plates to clean them properly.
This is going to come in super handy during the holidays.
We're supposed to be doing a brunch in your pyjamas this Christmas, as I am still in mold recovery mode, and we want something very chill. Because of that I decided to check out how her waffle maker worked and at the same time test a paleo waffle recipe, that I found on this great blog.
The original post is here if you want to check into it more:
https://nurturemygut.com/best-gluten-free-waffles-paleo.html/

It turns out the waffle recipe was quite scrumptious and used ingredients I already had plenty of.
Was a tad concerned about the almond flour base as we had made crepes with an almond flour recipe found on Pinterest, and to be quite honest, it was just horrid. This waffle recipe really exceeded expectations and we freaking went to town on them.
I followed the instructions with regards to how much to put in the waffle maker, as it had been way too long since I made them, and it wasn't my recipe. Turns out the double waffle maker was much larger because it took two tries to figure out that it needed a full cup of batter per waffle. As such, the early waffle tries were a bit lacking but tasty misses, nonetheless. I could have put more in, when I saw it seemed a bit empty but I didn't know how much it would smoosh out and I really did not want to have to clean a mess.

This waffle maker didn't drip out and the waffles, although a bit lighter in colour, came out beautifully.
I smothered them in maple syrup and fresh blueberries. As you can see, nothing was leftover.


I remadw them a sexond time with more patience and cooking each for 5 minutes gave me that golden hue you waffle want!

We had a piping hot cup of chai tea as mom has been asking for it the last 2 weeks.
That tea has become oft requested, and it was perfect on a cool fall day.
I used my absolute favorite chai tea from Kibou the. I find it is the best chai tea I have ever had.
It is not expensive, about $7.50 Canadian for 50g, & it is whole leaf black tea with real spices that are perfectly balanced.

If you would like to try it, you can purchase some here:
https://kiboutea.com/produit/chai-cochin-masala-50g/

The recipe follows, enjoy!


DAIRY-FREE CHAI TEA

Ingredients:

4 Cups unsweetened oat milk or almond milk (oat milk is creamier)
2 Cups Boiling water
3-4 tsp Chai tea (I use 3 because I don't like it too strong)
3-4 Tbsp Real maple syrup (I use 3 because I like it less sweet)

Method:
-Begin to boil the water in a tea kettle.
-In a medium sized pot, large enough to hold all the liquids, bring milk of choice to a simmer.
-Place tea in a large tea ball and put into simmering milk. If you do not have a tea ball you can throw the tea straight in the pot with the simmering milk, you will just have to strain through a fine, mesh strainer at the end.
-Pour boiling water into milk and tea mix. Continue to heat for 3-4 minutes. Remove tea ball or strain, and and return to pot.
-Keep on low heat, add maple syrup to desired sweetness, stir.
-Turn off heat and serve immediately.

Makes 6 servings.

Let me know how this recipe turns out for you in the comments section below.

Take care, be well, love freely...
Chef Kiki