Image Slider

Showing posts with label Homesteading & DIY. Show all posts

My 2019 Organic & Heirloom Garden Adventures!


Heloodles sweetpea's!

I am back with wonderful and fun-filled gardening adventures! This May 2019 marks 1 full year out of the toxic black mold environment and I am so happy to announce that I am doing great!!! Not 100% but man am I healing and growing, in leaps and bounds! I feel so very blessed and grateful.
An unfortunate side effect of the mold poisoning, was that I had been truly ill with constant autoimmune response, and thus unable to garden since summer 2016. I tried in 2017 but had no energy and was in such debilitating pain all the time, that it made the rigours of planting and harvesting unlikely.

Well, this year there's nothing holding me back from getting my green thumb on!


Where we moved to there's a lot of backyard space and my landlord is super chill with my gardening, as long as I don't dig up his terrain. This worked out perfectly, as I have been wanting to use felt pots for my "raised bed" garden. I discovered Smart Pots and Vivosun pots, which are fabric containers that allow you to garden in a very affordable manner and frugally. Double win!
For those of you wanting more of a visual, there are pics, a write-up, links, and video of these pots in use, that will be posted in the 2nd part of this 2019 gardening post.
Will link it here when it's up:

Here's what I have been up to for seed & seed starting part 1:
I am over the moon with all the varieties and cool produce I may be enjoying. This is a small portion of the seeds that I finally received, and am trying out. Out of all the seeds I got only the Scotch Bonnet hot peppers were not organic. I have a friend who has callaloo seeds and we have planned an exchange for some of my mango pick-a-peppa jelly.
Oh! yeah! It's all coming together hehhehheh.

I believe in all, I have planted, started, or am about to plant, 30+ varieties of fruit, veg, and herbs.


Admittedly, I went a little bit crazy on the variety of plants I have chosen to take on but as I was out of commission for the last 3 year's,  I want to go all out and have a blasty blast!
I purchased some organic seeds on-line, from our local greenhouses and specialty garden stores. I managed to score some unique varieties for my neck of the woods, along with cool heirloom seeds and some trusty standbys.
I wanted green tomatoes for fried green tomatoes and chutneys.
Red celery, this is supposed to taste sweeter than green varieties.
These watermelon radishes are going to get the pickling and fermenting treatment.
I will finally have organic watermelon with seeds, as nature intended, and as Dr. Sebi says is alkaline/best for us humans.
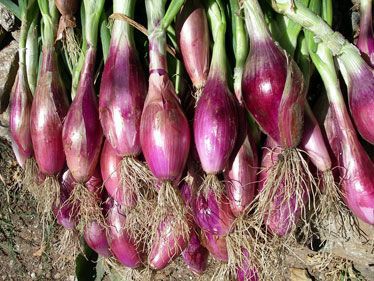
These red florence onions are a variety from France. Gonna be great in soups and stews!
I chose an heirloom and organic rainbow carrot mix, they have sprouted and I am hoping for happy tubers.
I also got this super cool Save the Bee's seed packet from my grocery store, that had them to give out for free. I had read last year that Veseys Seeds had partnered with Cheerios, to provide free sunflower seed packets to help people plant pollinator friendly plants.
I found out about them too late, however, this year I saw them on the counter near the checkout at the grocers and asked for my free seeds.
It was kinda cute watching the staff and managers scratch their heads in confusion.
They literally had no clue what they were, how they got there, and had difficulty with the whole FREE concept. After about 10 minutes, I left with my trusty seed packet in tow, quite happy.
Some people felt that Cherrios was being rather hypocritical, as their GMO products with insecticides are doing more harm than good to ravaged bee colonies, along with some of previous year's packets containing species considered invasive in some parts of the U.S.
Here in Canada I got sunflower seeds, do not eat cheerios as they are gluten full, stick to my organic cereal brands, and am planting non-invasive support plants to help bees and protect my plants from predation. You decide for yourself what you need.

I am thrilled to report that those sunflower seeds have germinated and are growing stupendously. I have big plans for those tall, pretty suckers.
Can't wait- but I will.
We found this great place not too far from me, called La Shop Agriculture, that specializes in locally grown, produced and sourced products for your garden. I will do a whole blog post on them another day, as I adore them and want to showcase their awesomeness in a post that will be all their own.
Unfortunately, it has been really rough,  weather-wise here in Quebec; and it's caused delays for all of us in the green growing community. Our last frost was supposed to be April 25th and here we are May 10th and still getting frost advisories.
Wah Wah Wah...

                           And May apparently...

Decided that I will work smarter, not harder, and achieve some gardening baby steps while I wait for sunshine, lollipops and rainbows.
Here are my beautiful seedlings that I started and I know it sounds garden dorky but I am one proud green sprout Momma!


I will have more coming up and am excited about sharing some recipes and loads of growing tips and tricks. For now I leave it here and am going to snuggle in with my cozy blankets and a good book on this wet, cold and rainy.

God bless all you gardner's out there and remember to do your part to help encourage and protect our pollinating bee colonies!

Take care, be well, live freely.

Chef Kiki

Water Bath Canning Tomatoes Homesteading 101


Bonjour sweetlings'!

Today is covering a very basic, good to know-how, water bath canning method for those end-of-summer, ripe, tasty, tomatoes.
Last summer, when I participated in some open summer markets, I got into a very serious discussion with a man about saving summer fresh tomatoes, so you could enjoy them all year round.
I confessed to being a canning newb in this department but did have two cases of Quebec field tomatoes that I was not sure what to do with.
Well, said Monsieur had loads to tell and thus began a very lively back & forth, with other market goers chiming in, about water bath canning methods, levels of acidity, and the joys of opening fresh summer tasting tomatoes in freezing cold January.
Say no more, I told the man, I am sold!
Truthfully, that winter fresh tomato bit totes had me, and I decided to go home and do the do. Then I hit a little snag in the best of intentions world.
Turns out that the tomatoes were way too delicious and we ate 40 lbs in two weeks! Okay, we did share some, dehydrate some, but honestly, it was a tomato food fest. Everything from bruschetta, soup, roasting, stews, and humble sandwiches, managed to put such a significant dent in those 40lbs, that there were not enough left to can. Wah wah...
                                          bad puns 15 Some good but mostly bad puns (16 photos)
   This year, I promised would be different and it has been. I have managed to buy a 20 lb case of Québec field tomatoes at the darling price of $9 and have canned 80% of them. The rest I am making homemade ketchup with and indulging in the occasional tomato sandwich-eureka! Sounds like a perfect lunch idea for today. Hehheh.

Before I launch into the how to, I am including two simple charts, (one from the university of Minnesota, the other from https://realfoodrn.com/using-scobys-to-balance-garden-ph/ ) that show the acidity of items one often uses in canning, and the affinity forplant ph preferences in the garden.
Why are acidity levels important?
Good question. Harmful bacteria, that can be deadly to us humans, cannot thrive in acidic environments. It is important to use acid to neutralize dangerous stuff like botulism, which loves sitting in an anaerobic (zero oxygen) environment, which we so kindly provide when canning. Adding acid to food stuffs when canning, ensures safety, brightness of colour, and helps maintain freshness along with flavour; all a boon for intrepid canners!
I can already hear the question tumbling in your heads, but aren't tomatoes really acidic?
Another great question! Though tomatoes may seem very high acid foods, their ph levels fall into a lower acid plane, thus making the addition of acid a necessity. This is easily rectified by using something as simple as lemon juice. see the charts and then continue below for the process, it is the perfect time as these summer beauties are on their way out.

                          Acid Chart for Canned Tomatoes

                            Using SCOBY’s to balance garden pH


So, first step is getting the most beautiful, fresh, ripe, not rotting, tomatoes you can. I always recommend farmer's markets at this time of year for solid reasons.

1-Support local farmers, as a consumer, where you choose to spend your dollars speaks volumes as to the kind of world you want to live in and leave for the next generation.

2-Local farmers have more genetic diversity in their crops because many use heirloom seeds and organic farming practices, this means a greater variety along with less GMO's to make you and yours, along with our bee populations sick. SAVE THE BEES!

3-You cut out the middle man, it is coming in straight from the fields, usually the same day and heads directly to the shelves. Farm to table is the way to go.

4-Freshness and variety along with early morning get-go, on your part, means greater quality beginning and end product for you and your loved one's. See #3 if you need further clarification.

5-It is a vibrant, fresh, and aliveness that you will never find in mass produced grocery store holdings. Believe me when I tell you, a good farmers market, will have you feeling so good!

6-It is a perfect time for a family outing, this is a teachable moment for old and young alike. I find new things whenever I go to the market, most recently, a very cool eggplant, that was round, hails from Italy, and contains loads less water; making it perfect for grilling and pickling!

7-As a professionally trained Chef, we know quality is greater than quantity, however, when nature's bounty has arrived, trust me, at the farmers market you WILL find both & for fabulous prices!

Here are the loverly tomatoes we have had this season, please keep in mind that field tomatoes are not perfect or always uniformly "pretty", in the grocery store sense. That is what you want, the tomatoes you are getting will taste better than hothouse one's and will prevent perfectly good produce from ending up in land-fills, contributing to methane gas emissions and thus the demise of our planet. Lower your expectations for the outside looks and learn to appreciate touch, smell, taste, and inner beauty. You really cannot judge a book or tomato by it's cover!
                           
Prep your mason jars and lids, by washing them well, making sure you have enough of jars, seal lids, and screw tops. Then fill a canning pot with water to 3/4 full, in a jar basket, place in your mason jars that need to be filled with water too, add more if need be but be careful because too much will boil over. Turn head to medium high, bring up to boil and turn off immediately, while still hot, after about 15 minutes, place the snap lids in the water. This will ensure no bacteria but will not melt the seal part to the snap lid, that you need. At this point, I make sure I am ready for all the steps to come, I prep a large baking tray with a dishtowel, have my ladle, canning funnel, iar removal spatula, snap lid, magnetic wand grabber, and bowls, all good to go.
Now, onto tomatoes.
You need to thoroughly wash your tomatoes, no dirt must remain as this can be a botulism home. Once washed, get a large stock pot of water boiling, score an X (not too deep) on the bum of the tomatoes. You will need a large bowl with lots of ice-cubes and more ice-cubes at the ready. This is to quickly cool the tomatoes upon removal, so they do not keep cooking. I buy a large bag of ice at the corner store to be safe.
Once your water is boiling, add 4-5 tomatoes at a time to the water, carefully, depending on size. We had some that were huge, I did 2-3 at a time. Leave in for 30-45 seconds. Remove using a slotted spoon, and place immediately in the ice water bath bowl. Leave in there for about 1-2 minutes, the skin will start to peel off. That is a good thing that you want!
Once you have done this, peel all the skin off of the tomatoes, (I keep these skins and either freeze them for making tomato jelly or ketchup at a later date, they hold loads of flavour)
                                       

Next, you will begin to slice, then chop your tomatoes that no longer have their skins, into medium to large dice, depending on what you use them for.


Once this is done, you will place them in a bowl. Now, CAREFULLY, remove the mason jars, empty the water, and place them on the tray you prepared. Place the canning funnel on a mason jar and using a ladel, begin filling with tomatoes. I fill it to an inch below the neck, you must leave 1/4 inch head space for the safety seal to be able to happen, which includes the lemon juice you add. Then add 2 Tbsp of lemon juice for 500ml jars and 3 Tbsp lemon juice for 1L jars. I made 6 125ml jars and added 1 Tbsp of lemon juice to those. I made three different size jars because I need differing amounts, depending what I am making. Soup requires 1 L jar of tomatoes, Stews or Sauces 500 ML and sometimes sautées require 125 ML size. You will know what you use them for. I have not given you the number of jars because this will be dependent on the amount of tomatoes you buy. I will give you my amounts at the end of this based on my 20 Lb purchase.
Once you have packed the tomatoes and added lemon juice, clean the rims and sides, add the snap lids, and add the rings. Screw the rings finger tight aka snug but not tightened. Should you need to see an easy breakdown pic, see below from pickyourown.org.
This simple picture, step by step guide, comes from:
http://www.pickyourown.org/water_bath_canning_directions.php
                       Directions for Home Water Bath Canning: Step by Step Instructions to Use your Waterbath Canner

Now that all is ready, it is time to place your filled mason jars back in their basket and put the water back on to boil. I bring it up to a boil, reduce to high heat, and allow to process for 15 minutes. Then you remove them CAREFULLY, from the water, place on your cloth lined tray, and allow to cool. The lids will make a POP popping sound and the lids will be sucked in in the middle. That means you got a seal and these jars will last 1 year in a cool, dark place. If this does not happen, you must not leave these on a shelf. Place them in the fridge, and eat them within 1 month. Alternatively, you can remove the snap lid, try using a new one, make sure the jars are not over filled, and process them once more.


canning the old way


On the right is the jar waiting to be processed, and on the left is a jar that has already been processed. There will be some colour change, this is normal.

Do not forget to label what is inside, along with the date and year. This is important to prevent spoilage and to know what is in your pantry, when you go to use your canned items 4 months from now.

My total tomato haul= 2x20 Lbs tomatoes, used about 1 case for a variety of stuff. Canned 1x 20Lbs=
3x 1 L jars
12x 250ML jars
6x 125ML jars

I highly recommend researching properly and buying or borrowing from a library, some small batch canning books or food preservation books. I am constantly learning and there are many wonderful resources available to you, take advantage!
I am only offering tips on water bath canning methods for mow, as I do not yet own a pressure canner. If you would like to learn more about pressure canning, please click on the links below. I am including a link to buy a pressure canner, which is supposed to be some good one's; I myself am eyeing the 30 Qt all American  model. Remember a pressure canner is what you want, not the same as a pressure cooker at all!

                   All American 921 21-1/2-Quart Pressure Cooker/Canner All American http://www.amazon.ca/dp/B00004S88Z/ref=cm_sw_r_pi_dp_Sbfzub0NA0MVP
http://www.simplycanning.com/pressure-canners.html
             
Thanks so much for stopping by, leave any questions down below, I love to hear from you. Don't forget to subscribe & happy canning!

https://www.attainable-sustainable.net/pressure-canning/

https://survivallife.com/canning-jar-guide/ 

The Best Citrus Queen Anne's Lace Jelly Recipe and Foraging


Good Glorious and Gorgeous Morning!

Today, I am telling you all about my summer Queen Anne's Lace foraging experiences and the citrus Jelly I am making with them.

*Very important to note before I tell my tale, should you choose to forage it, you must be exceedingly careful NOT to confuse Queen Anne's Lace with Hemlock*

Below there's information on Queen Anne's Lace from the following site:

http://www.ediblewildfood.com/queen-annes-lace.aspx

QUEEN ANNE'S LACE:
Queen Anne’s lace earned its common name from a legend that tells of Queen Anne of England (1665-1714) pricking her finger and a drop of blood landed on white lace she was sewing. Belonging to the carrot family, Queen Anne’s lace is a biennial that is also known as wild carrot. Early Europeans cultivated Queen Anne’s lace, and the Romans ate it as a vegetable. American colonists boiled the taproots, sometimes in wine as a treat. Interestingly, Queen Anne’s lace is high in sugar (second only to the beet among root vegetables) and sometimes it was used among the Irish, Hindus and Jews to sweeten puddings and other foods.
Distinguishing Features: The Queen Anne's lace flower resembles lace, and oftentimes the flower has a solitary purple dot in the centre. In addition the root smells like carrots!
Flowers: Queen Anne’s lace flowers have a flat-topped white umbel, sometimes with a solitary purple flower in the center. These flowers bloom from late spring until mid-fall. Each flower cluster is made up of numerous tiny white flowers. The flower cluster start out curled up and opens to allow pollination. The cluster then rolls itself shut again, like a reverse umbrella when it goes to seed at the end of the season.
Leaves: Feathery leaves resemble those of the domestic carrot. The bases of leafstalks are broad and flat. Queen Anne’s lace leaves also closely resemble the leaves of the poison hemlock, fool’s parsley and water hemlocks, all poisonous cousins of Queen Anne’s lace.
Height: Wild carrot can grow tall, most average about 1 metre tall.
Habitat: Queen Anne’s lace is found in fields, meadows, waste areas, roadsides and disturbed habitats. They are very hardy and thrive in a dry environment.
Edible parts: Using first year Queen Anne’s lace plants are recommended. Roots are long, pale, woody, and are finger-thin and are used in soups, stews and in making tea. First year leaves can be chopped and tossed into a salad. Flower clusters can be ‘french-fried’ or fresh flowers can be tossed into a salad. The aromatic seed is used as a flavoring in stews and soups.
Poisonous Plant
 Similar Plants: Poison HemlockFool's Parsley 

This is a picture from when I was foraging at a later date by myself, I was still a bit sleepy as it was 6am when I went out to pick Q.A.L. 
I almost grabbed Hemlock by mistake and went, whoo hoo hoo! 
No touchie that stuff Kiki!
That was when I thought, it might be a good idea to take a side by side pic to help any of you foragers that might be interested. 
The Hemlock is on the left & the Queen Anne's Lace is in my hand on the right. You can see how a novice could easily make a mistake and forage something, literally, deadly! Remember that Hemlock has a center of small yellow flowers with a cluster of white small petals around; whereas Queen Anne's Lace looks like a bird's nest, has white flowers and a very tiny purple "heart" center.
Below is the Queen Anne's Lace with that purple "heart", it is very small but easier to tell the difference if you are unsure. Remember that sometimes they already fall off, so you might not always see it. If you are not sure, ask, use a floral finder app (yup, those exist) and walk away without, if you are really unsure. It is always best to err on the side of caution.

I received a call from Lady T and she told me that all the Queen Anne's Lace was out and in full bloom.
As it turned out my son needed a serious getaway from the city; so I asked him to come with, for a day of foraging, feeding chickens, and country fresh air. When we first arrived,we could see my son decompress in 10 minutes; it's amazing what getting away from the pressures and speed of the city can do to a person. We both agreed that moving out to the country one day would be something to work for, in our own respective houses of course!
It was beautiful and we got a lot of foraging done, I did not take pictures because it was by the side of a mildly busy road, was really hot, way too sunny, and we had a lot to do.
I did not feel right taking pictures, which could have been dangerous and made us slow down. We were at it for about 2-3 hours and then we ran to get something icy and cold to drink.
At the house, Lady T made them both some yummy gyros with tzatziki sauce and bbq chicken. I was breaking my juice fast, I chose to eat a light salad and drink a freshly made savoury juice.
We had fresh blueberries for dessert and enjoyed a quiet end to the day.

This was one of the several bags we managed to forage, just a little tip for you intrepid foragers. Do not bring these bags in your house!  These along with any other flowers you forage will have so so so MANY bug critters and you DO NOT want an infestation. It does not take long for a nest of bugs to set up shop in your home, don't risk it! 
I leave them out back and when I am ready the next morning, I grab a bowl, a big garden fork, and then I proceed to CAREFULLY and GENTLY shake out the flowers. Fork remove any beetles and unwelcome critters. Do not leave longer than overnight to begin processing these flowers, as they are so delicate and will end up as a loss. They are just not made to last long, once picked.

These were what I started with:

And then I had these cute tiny blossoms:

It's time-consuming, I suggest some fav tunes, sitting comfortably, and asking for some help from hands that can be patient and gentle.

This is how they look when all the flowers are removed, feel free to compost these:


By the time we finished picking everything apart, we had my pitcher full and I could proceed with my steeping process, to draw out the flower flavour, for jelly making.

I do not have a pic of the actual steeping process, to be honest, it looks a tad yuckie. I get that that is not yummy sounding at all, as such, I decided that you did not need to be exposed to the unappealing part. I did manage a pic of the strained steeping liquid; which was a beautiful rosy blush, infused with Queen Anne's Lace loveliness. It's below with the steeping liquid recipe.


This is the glorious and perfectly pretty jelly that I got from this wonderful citrusy floral combo.

I tested it on waffles, just to be sure that it was the proper level of deliciousness before I shared it here. Fear not my lovelies, it is a citrusy wonder of scrumptiousness! I am selling this in my Etsy shop, until supplies last. This is obviously a seasonal, short-run item, but I managed to get in a few foraging sessions and made loads of steeping liquid. When I went the last time, there were smaller flowers but very abundant.

 This has given me a few jars more than anticipated, I am excited to share them with you in the soon to re-open shop (It is really, really, almost opening day!). I may do a giveaway with this flavour, let me know in the comments if that would be something you would like; I could even add one of my jars of Lilac & Pineapple Jelly as a floral taster giveaway set. The Lilac & Pineapple Jelly is so pretty and is one of my best sellers, people really adore it. It looks like this and tastes heavenly:

Does that look yummy or what? As I said, comment down below if you would like this. as a giveaway contest.


Here is the recipe for those of you who want try this out in the summer, picking/foraging Queen Anne's Lace starts at the end of July and goes into the earlier weeks of August.

THE BEST CITRUS QUEEN ANNE'S LACE JELLY
This recipe makes about 4x250ml mason jars

Ingredients:

2 1/2 Cups Steeping liquid (recipe follows)
4 Cups Sugar
2 Pouches liquid Certo pectin (85 ml each pouch)
2 tsp Powdered sugar-free pectin (I used Bernardin brand)

Method:
-In a non-reactive medium sized pot, heat steeping liquid and sugar until melted at a medium high temperature; making sure to stir constantly.

-Once sugar is melted, bring liquid to a rolling boil, add pectins, cook at a boil for no more than 1 minute, stirring constantly. Remove from heat.

-Skim scum and ladle into still warm, sterilized jars

-Process in a water bath canner, bring to a rolling boil and process for 10-15 minutes.

-Remove jars carefully and place on a rack, allow to cool completely.

-Chill in refrigerator before eating, as this really tastes best when it is cold. Ty it on toast, waffles, it would be really great with scones or as a filling in a sponge cake with whipped cream.
Oh yeah! The possibilities are endless.


CITRUS QUEEN ANNE'S LACE STEEPING LIQUID:

Ingredients:

4 Cups Foraged, bug-free, Queen Anne's Lace blossoms, gently removed from the plant stems.

8 Cups Citrus liquid such as orange juice or grapefruit juice, I used pink grapefruit. (pulp-free)

Method:

-Place blossoms in a non-reactive bowl, that can handle hot liquid, large enough to contain the blossoms and the liquid. Do not put the liquid with the blossoms yet!

-In a large pot, heat the liquid, once it reaches scalding (do not boil), gently pour over blossoms and stir until all are covered. The flowers will float to the top, this is fine.

-Allow to cool to room temperature, cover and place in fridge overnight.

-Using cheese cloth covered strainer, strain the steeping liquid with a bowl to catch the strained liquid underneath.

-You may need to do this twice to be sure you have a clear liquid, now you may use the amount required for the jelly recipe up above. This recipe is high in acid and may give varying results when making the jelly, that is why I recommend using both liquid and a bit of powdered pectin for the jelly recipe. I did have a bit of a problem with my first batches as I had foolishly added another acidic juice in a bid to play with the flavors, I had to fix several batches; so don't do that.

-The rest of this liquid can be frozen to use at a later date.

Leave any questions or comments down below, don't forget to subscribe and let me hear from yah if you give this recipe a go.


Take care, be well, love freely.